Rebuilding your Raw Water Pump
These instructions should only be used as a supplemental guide
to the factory Service Manuals.
The Inboard water pump is mounted on the engine.
It is usually down low in the bilge on the front lower starboard side of the engine.
The Raw Water pump should be rebuilt every season.
The Water Pump is belt driven. It has two hoses attached to the rear housing.
One hose is the water intake hose and the other feeds to the engine.
Mercruiser has made some changes to the pump design and method of mounting through the years.
Early Raw Water pumps such as those on the old 340 or 7.4L Inboards and TRS model engines used
a "clamp-style" bracket which clamped to the nose of the pump. Later styles used a cast bracket to which the pump
mounted to on the front side of the pump housing. Later on came the stamped steel brackets which are still used today.
Early fuel injected and carbureted engines mounted the mechanical fuel pump to the side of the water pump housing.
If you have a fuel pump mounted to your water pump housing special care must be taken to avoid
damage to the fuel lines while servicing the water pump. In short... you will loosen and remove the fuel lines and
take the entire water pump assembly off of the engine with the fuel pump still attached. More on this later.
To service the Raw Water Pump it will have to be removed from the engine along with its bracket.
It's a fairly easy job although restriction to access can make removal and installation difficult.
Rebuilding your Raw Water Pump Assembly First remove your boats battery as so the engine won't crank and injure you. I know,
it sounds corny but just do it.
Stick your head down into the bilge and take a close look at how the two hoses attach
to the back of the water pump rear housing. If you accidentally reverse these hoses when installing the pump,
you will ruin your new impellar. Label both hoses and draw the configuration on a note-pad so that when you go to
reassemble the pump to the engine you won't get the hoses reversed.
Be aware that if you have the boat in the water that when you remove the hoses from the pump
that water might start rushing into the bilge. Never leave the boat once the pump is disconnected unless you have
clamped a plug into the intake hose to prevent the boat from sinking.
Look to see if you have a fuel pump mounted to the side of the water pump. If you have a fuel pump mounted to the side of the water pump,
you will have to shut off your fuel supply at the fuel tank.
Failure to close off your fuel tank could result in damage, injury or death.
I know... it sounds corny but just do it.
Once your fuel valve is closed and you know that you have already removed the battery from the boat, it is safe to proceed.
Use a good 3/4" Flare Wrench and loosen and remove all the metal fuel lines.
This will allow you to remove the water pump with the fuel pump still attached.
The pump is mounted to the engine with one Main Bracket and one Brace.
The Main Bracket is mounted to the front face of the pump.
It also bolts to the front of the engine block with two bolts.
Older Vee-Belt equipped engines had the Main Bracket had a slot in the lower bolt hole which
allowed the pump to swivel in and out to tighten the belt. Newer engines with tensioner pulleys and/or Serpentine Belts
did not need the slotted Main Bracket.
The Brace is about 1" wide and flat. It bolts to the bottom of the water pump and usually
passes under the front of the engine and bolts to the front of the block.
This brace gives the pump a little more support. Earlier braces were slotted to
allow the pump to swing to adjust and tighten the water pump belt.
If the water pump has it's own belt, it will have the slotted Main Bracket and slotted and
adjustable lower Brace.
Use a slotted screw driver or a 5/16" nut driver and loosen the hose clamps that hold the large fat
thromostat hose in place. Remove the hose. This will give you better access to the Main Bracket's mounting bolts.
READ THIS: The upper Main Bracket bolt may be located just behind the Circulation Water Pump.
Depending on what model engine you have, you may or may not be able to remove this bolt without first removing
the Circulation Water Pump. The Circulation Water Pump is the wide metal pump bolted to the middle of
the front of the block. It is held onto the block with 4 bolts. The upper Main Bracket bolt might just barely
clear the Circulation Water Pump. Some do and some don't.
I suggest that you try to remove this bolt FIRST. If it won't clear the metal Circulation Water Pump, you
will simply have to remove the Circulation Water Pump. No biggie. It comes off pretty easily.
If neccessary, remove the Circulation Water Pump from
the front of the block to allow for the removal of the upper Main Bracket bolt.
Use your slotted screw driver or 5/16" nut driver
and loosen the clamps to the two water hoses on the back of the Raw Water Pump. Try to pry off the hoses without destroying them.
If the boats in the water don't forget to install and secure a plug in the water intake hose. Removing these two hoses from
the back of the pump can be difficult. Sometimes it's better to get the pump pulled away from the engine first.
Remove the bolt from the port end of the Brace. This bolt
is located on the port front side of the block.
Remove the lower bolt from the Main Bracket and lift the pump out of the bilge.
You should now have the entire Raw Water Pump Assembly along with the Main Bracket and the Brace in your hand.
Go into your garage or shop and grip the pump by the Main Bracket in your large vise with the hose fittings facing straight up.
Scribe marks on the pumps housing down to the Main Bracket as so you will be able to align the pump to the Main Bracket during reassembly.
Don't clamp the pump itself or the pumps pulley in the vise or you will damage it.
Remove the five screws that hold the rear pump housing to
the front pump housing and remove the rear housing assembly. The impellar might come off with the housing, that's OK.
Pop the impellar out of the housing and give everything a good inspection.
NOTE: You will not have to disassemble the shaft, bearings and seals from the "nose" housing.
Just leave all that together unless you feel the bearings or seals are bad.
Refer to the Shop Manual if you decide to rebuild the nose housing.
NOTE: Some changes have been done to the pumps over the years.
Older style pumps had multiple layers of parts on the rear of the pump.
The old style tended to leak at the gaskets.
Mercruiser improved the pump by using a single rear housing section.
The new style pumps are less likely to leak and they are easier to build.
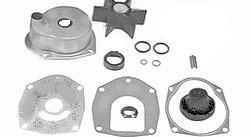
If you have an older style raw water pump, you will be buying the Raw Water Pump Upgrade Kit.
This Kit will replace all the old style multiple layers as so you will have the improved one-piece rear section.
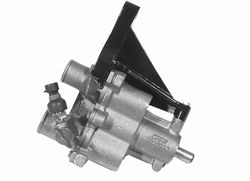
The latest pumps which are used on the 496 and MX 6.2L engines are different yet (see image).
Assembly is the opposite of disassembly. Grease up your new impellar. Make sure your oring is in place.
Place the impellar on the shaft with a new key. Grease up the inside of you impellar housing. Lower the housing down over the
impellar while turning the pulley in the correct direction. Install the fasteners being careful not to
over-tighten them. Install the pump onto the engine and your done!
Mercruiser Water Pumps and Kits
Mercruiser makes the best Raw Water Pump Assemblies.
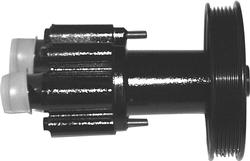
Pumps are offered with the machined nose for the older
TRS/ Typhoon Engines that used the clamp brackets, the standard
front plate mounting style, the Fuel pump style and the
newer serpentine belt style.
Kits are availiable for the 2 piece body style and
kits are also here to upgrade your pump to the newer
one piece style all plastic housing.
New Raw Water Pump Update Kit 46-807151A14 for $140.00
Pump kits and Impellars are in stock for all Mercruiser
applications including Alpha One, R, and Alpha Gen 2 models.
Alpha One and R Water Pump Kit 46-96148T8 for $71.00
Alpha One Water Pump Base 46-44292A3 $46.00
Pre-Alpha Water Pump Base 46-57234T1 $50.00
Alpha One Generation II Water Pump Kit 817275K05 changes to 817275K05 $190.00
Sea Water Pump Assemblies
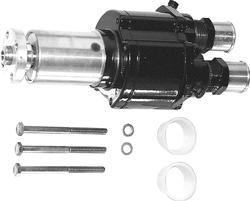
Sea Water Pump 46-807151A12 $574.00
Fits GM V6 & V8 (454 & 502 cid) Gen VI engines with v-belt and electric fuel pump.
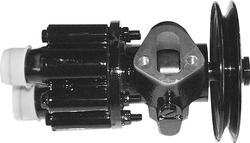
Sea Water Pump 46-807151A9 $571.00 (Pulley not included)
Fits GM V6 & V8 engines with serpentine belt and electric fuel pump.
Sea Water Pump 46-862914T10 changes to 8M0137216 for $586.00(without air fittings)(brass housing) (Pulley not included)
Fits MCM and MIE 4.3L MPI, 5.0L MPI, 350 Mag MPI and MX 6.2L MPI with ECM 555.
Picture does not show air fittings Sea Water Pump 46-862914T11 changes to 8M0139996 for $1005.00 (with air fittings)(brass housing) (Pulley not included)
Fits MCM and MIE 4.3L MPI, 5.0L MPI, 350 Mag MPI and MX 6.2L MPI with ECM 555.
Sea Water Pump 46-72774A32 $724.00
Fits V8 engines with v-belt. Nose is machined for clamp-style bracket. (Pulley not included)
Sea Water Pump 46-807151A8 $994.00
Fits GM V8 (454 and 502 cid) Gen V and VI engines with mechanical fuel pumps.
Fuel pump mounts to the water pump.
Includes v-belt pulley.
Sea Water Pump 46-862914T08 changes to 8M0139994 for $775.00
Fits MCM 496 Mag and HO and MIE 8.1S and HO.